So, my bed used to look like this:
Once upon a time it was a beautiful mahogany color with rattan/cane insets. Over time the woven parts started to dry out and crack. It wasn't terribly noticeable and I thought I'd be able to fix it.
Enter the toddler.
One day he saw a tiny hole and must have thought, "Hey, I bet my finger would fit in that hole! Hey look, it does! I wonder what would happen if I pull? Hey, that's cool! I should keep going." And he kept going, and going, and going…
So my crafty self then spent literally hours scouring Pinterest for upholstered headboard tutorials. The more I investigated it, the harder it started to sound. You know how you get overwhelmed with ideas and suddenly the whole project is so intimidating that you talk yourself out of it? Yup, that's what happened.
Then I thought I could just do a slipcover for the footboard and headboard. This is a Cal King bed and the headboard is 92" wide. Good luck finding fabric that width so you don't end up with a seam right down the middle. The only thing wide enough was a curtain panel 96" long or longer turned sideways. I looked. And looked. And looked. And I couldn't find any fabric that I liked that didn't cost an arm and a leg.
And then one day, I stumbled across this photo on Pinterest from Little Yellow Barn.
 |
| http://littleyellowbarn.com/2013/02/diy-barn-door-headboard/ |
The heavens parted, I heard harps playing, and angels began to sing. And I'm really digging the whole rustic industrial design concept so this will be the rustic part. (I know, I know, I'm probably three years late to this party but what can I say? I don't pay attention to design stuff until I desperately need something and then I research it to death. Plus I visited a girlfriend's house and was bowled over by how cool her house was with the perfect blend of extremely contemporary and totally rustic. Who knew this whole farmhouse/warehouse thing was "a thing"?
Enter my awesome hubby. He can fix or build anything, and I truly do mean anything. Our kids say, "Daddy fix it" anytime something breaks, whether it's a toy or the refrigerator. He loves to build things and he owns more tools than any one person should. Know what a Shopsmith is? He has two. TWO. Why two? Don't ask…
So when I showed him the photo above he loved it! And when I told him it would probably cost less than $150 (at least in lumber) he was skeptical but I did the math and guess what? I was right! We spent $120 on pine boards from the local home improvement store.
Disclaimer - this truly is more of a brag post than step by step instructions since my husband did all of the actual assembly, but I'll tell you what we bought and if you're handy I'm sure you can do it too!
So we bought 8' long pine boards (for some inexplicable reason they're called Whiteboards when you go to Home Depot or Lowes) and brought 'em home, grabbed a few stains and started experimenting. We bought the smallest sizes of Minwax Weathered Gray, Minwax Carrington, and I already had white latex paint and an antiquing glaze in Java Brown.
I wanted the boards to be a brown/gray mix, the color that a fence turns after a few years in the sun. It starts out that lovely reddish brown and ends up a warm gray.
But first, the distressing process! Hubby grabbed a bunch of random tools from the garage and one of the boards. He hit it with pliers, a hammer, and dragged other sharp tools across it to give it nicks, gouges, and holes. Then I got in on the action because it looked fun! I smacked it with a crowbar and we made a paddle out of an extra piece of lumber with screws sticking out of it. You go back and forth across the boards with the pointy paddle like you're grating cheese. Finally I hit the edges of the board with a hammer. Just as if you were putting up a fence and you'd hit the board on the side to knock it closer to the next board over. Did that make sense? The goal is to make the boards look like they've been on a fence or a barn and you just ripped them off and made a headboard with them in their current state.
Then Hubby applied brown stain, let dry, light sanded, applied the gray stain and wiped it right back off. It was still pretty brown and although I really liked it and was very tempted to keep it this way, but we've had brown furniture for 10 years and I wanted this to be more of a cottagey gray.
 |
| Here's a shot of the color. I'll go into more detail about the actual construction of the doors in a bit, but this was the only photo I had of the color after staining. |
So I whitewashed it with a coat of white latex paint and then sanded the heck out of it. Went over it ONE MORE TIME with the Weathered Gray heavily diluted with mineral spirits. Like, a cup full of spirits and a splash of gray. Let dry, sanded once more.
And it was freakin' perfect! EXACTLY the color I had envisioned in my head.
 |
| After the coat of white paint |
 |
| After the final gray wash and a couple coats of clear polyurethane |
Now for the math - we decided to downsize to a queen mattress because our Cal King mattress was hard as a rock and I woke up sore every morning, but the queen mattress in our guest room is da bomb! So we decided to pilfer that mattress set and get a different one for the rarely used guest room.
Our queen mattress is 60" wide, but I didn't want the headboard to be EXACTLY the same width as the mattress. I wanted it to be a few inches wider on each side. I also knew the headboard would be two barn doors side by side - it's not one gigantic beast that's 6' wide. This will make it much easier to move and get through the doorway when we move to a new house, which we seem to do pretty regularly.
So that means each door would be 6 boards wide at 6" each, making the whole headboard 72" wide. That's a 6" overhang on each side of the mattress. Just enough to see the awesome headboard going all the way to the floor.
***NOTE: Did you know that 1x6's are not 6" wide? Huh, the hell you say. WHY, oh WHY are they called 6" wide if they're not? So my headboard that was supposed to be 72" was actually 67" when all was said and done. Which is still ok, but it annoys me.
So how much to buy? The pine comes in 6', 8', or 12' long lengths. I wanted it to be 6' tall but hubby thought 7' would be better, so we bought 1x6x8' boards, 13 to be exact. Then we brought them home, stained them with the brown stain, and lay them all out in the driveway to come up with the exact design.
 |
| Using some spare boards to create the ideal design. |
Hubby thought it would look more "finished" to trim all the way around the perimeter so back to the Orange Megastore we went, this time to get 1x4's. We used 1x4's to go around the outside edges, horizontally across the middle, and for the diagonal pieces. It came to about $120 total for the lumber, ($100 for the 1x6's and another $20 for the 1x4's) which was more than I had anticipated but it's still about a quarter of the price of a typical headboard. One twentieth of the price of one from Restoration Hardware! They are beautiful but cheap they ain't.
I can't really help much with the actual construction since Hubby did all that, but it's essentially 13 boards cut to be 7' tall placed side by side. That's an uneven number, I know. I had figured that each door would be 6 boards wide since we made two separate doors, but it wasn't quite wide enough to stick out on the side of the mattress by a few inches. We ended up making one door 6 boards wide and the other door is 7 boards wide. We arranged the vertical 1x4's in the center (where the handles are attached) so that they would overlap the board that's smack dab in the center of the headboard.
Each door has wood glue holding the boards together. Then a 1x4 across the top, across the bottom, and along each vertical edge fastened with screws on each board. This keeps it super sturdy and prevents the boards from warping. He cut the diagonal boards with a miter saw (I think that's what it's called where it can cut at a 45 degree angle, right? Shows how much I was involved in the actual construction of this baby!)
Now came the fun part - finishing and decorative accents. I grabbed the palm sander and sanded the whole thing with a rough grit sandpaper since it was pretty banged up from our distressing. Then I sanded a second time with a fine grit. This only took half an hour, not long. Except that it was 95 degrees out and I wanted to die the whole time. I'm such a wuss when it comes to heat.
Again, here's what it looked like when we were done with the painting/staining and ready for some hardware. They are two separate doors and once they were in place Hubby screwed them together from the back side at the very top center. I used painter's tape to put the handles in place and see how high they needed to be. Don't want to smack your head when you roll over during the night!
Finally we were ready for the hardware! We bought these door handles at Orange Megastore but they were flat black, so we hit 'em with a shot of Hammered Black spray paint to give the a more authentic appearance. Perfect!
 |
| http://www.homedepot.com/p/Crown-MetalWorks-Black-Traditional-Decorative-Garage-Handles-2-Pack-10021/203233035 |
I ordered these lights on Amazon and I'm going to attach them on each side of the headboard, as long as it doesn't look too busy. These will be our reading lights and now I won't need to go buy new lamps for the nightstands.
 |
These are $30 each on Amazon.
http://www.amazon.com/gp/product/B00MEANR7W?psc=1&redirect=true&ref_=oh_aui_detailpage_o01_s00 |
Last but not least we attached a DIY barn door track on top. Barn door hardware is UNBELIEVABLY expensive. I'm talking $400 expensive. They have them at Home Depot for the bargain price of $175, or $85ish on eBay once you include shipping. I knew we could do it ourselves easily.
NOTE: Since it's totally for looks and it won't be sliding anywhere it won't be weight bearing and doesn't need to be really strong. The headboard will be resting on the floor and bolted to the bed frame so the track will be mounted to the wall just for show. Let me say again - this is very lightweight and WILL NOT SUPPORT THE WEIGHT OF THE HEADBOARD. If you want your headboard to slide you can follow any one of the DIY tutorials online and make one that's strong for somewhere in the $50 range. Or you can buy some on Amazon now for less than $100, so the prices are coming down.
We used:
1 1x4 cut to be 8' wide and painted it white
1 1x2 cut to be 7' wide and painted it with the same hammered black spray paint I used on the handles
4 plastic pulleys that were $2.39 each that I found at Home Depot in the section where they have outdoor laundry racks. Apparently there are crazy people in the world who wash their clothes by hand and hang them outside to dry! *Gasp* The groove on the pulley perfectly fit the width of the black track.
8' worth of inexpensive silver metal from the steel pipes and bars section of Lowe's. It cost about $10.
Self tap screws, random pieces of scrap wood, and screws for mounting it to the wall
The photo above shows how we screwed the white board to the wall using 3 or 4 screws and screwed them into the studs. The black track is screwed into the white board with a few pieces of wood behind it to make it stick out an inch or two. See closeups below:
 |
| The pine scrap creates a gap between the black and the white boards. |
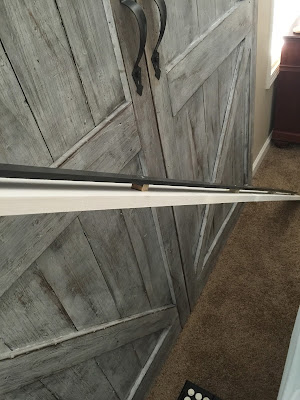 |
| We used 5 or 6 of the pine chunks to keep the black track evenly supported the whole length of the board. |
Now for the wheel and vertical piece.
Again, this is a plastic pulley and a piece of silver metal. We spray painted everything black. Hubby removed the extra hardware from the pulley till all that was left was the wheel. He took the thin silver metal piece (that's now black) and curved it around the handle of our refrigerator to make it have a nice curve and shape it into a U to go up and over the pulley, and down the back side a few inches. He secured it with a screw.
We needed two for each door. He cut the bottom into a rounded shape using tin snips (giant scissors) and sanded it smooth. We should have done all this and THEN painted it black, but since we did it backwards we ended up having to touch up the paint here and there.
Then we set the wheels up on the black track and figured out where to attach them. We used 3 self tap screws down the length of each strap to secure it to the headboard.
Then we screwed the metal bed frame to the headboard and we were done! The headboard itself is not attached to the wall at the top, just attached with the vertical straps to the pulleys, which are attached to the track, which is attached to the wall. Once the mattress is in place it's very solid and doesn't squeak.
And here we are all done! This would have been completed in a weekend but Hubby had to go on a business trip, so we started one Saturday, he left on Sunday morning, I did the staining/sanding/painting while he was gone, and then waited. And waited. And waited for him to get back on Friday evening. It was horrible! I was DYING to finish this project but I couldn't make the track without his help since he knew exactly what to buy at the store.
Now we're just waiting for the lights to arrive. I'll update this post once we've attached them. The plan is to drill a hole in the headboard behind the light, run the cord down the back of the headboard, and plug them into the wall. Hubby has to attach the cord since these are supposed to be mounted to a wall. He also has to install an on/off switch. (Thank god he's an electrical engineer.) This is what he told me to order from Amazon in case you want to try this yourself.
The cord:
http://www.amazon.com/gp/product/B00M6CHDYQ?psc=1&redirect=true&ref_=oh_aui_detailpage_o00_s00
The on/off switch:
http://www.amazon.com/gp/product/B00T6I8TTG?psc=1&redirect=true&ref_=oh_aui_detailpage_o01_s01
And the killer vintage lightbulbs!
http://www.amazon.com/gp/product/B00JRM3YDM?psc=1&redirect=true&ref_=oh_aui_detailpage_o01_s01
But for the wood, the faux track hardware and pulleys, the various stains, and screws I think the grand total came in at about $195.00. The lights are completely optional and added another $80 total for all the needed components. But man, do they add that wow factor!
Now I just need to redo all my other bedroom furniture to match the new decor theme. ;)
12/15/15: Edited again to add that we ended up making a couple of these headboards for other people too. Here's one in a king size but they wanted actual barn door tracks. The best price I found was on Amazon. The one I ordered is no longer available so I won't post the link, but the track and an extra set of 2 rollers was somewhere around $100.00.
I love how the doors stick out on either side of the bed and go all the way to the floor. It really makes it look like barn doors!
Happy building!